


#2 The Wealthy Maple Lead: How Much Can You Allocate to Savings?
Two 20-something Canadians create a personal finance guide about what they wish they knew earlier about investing and how to start.

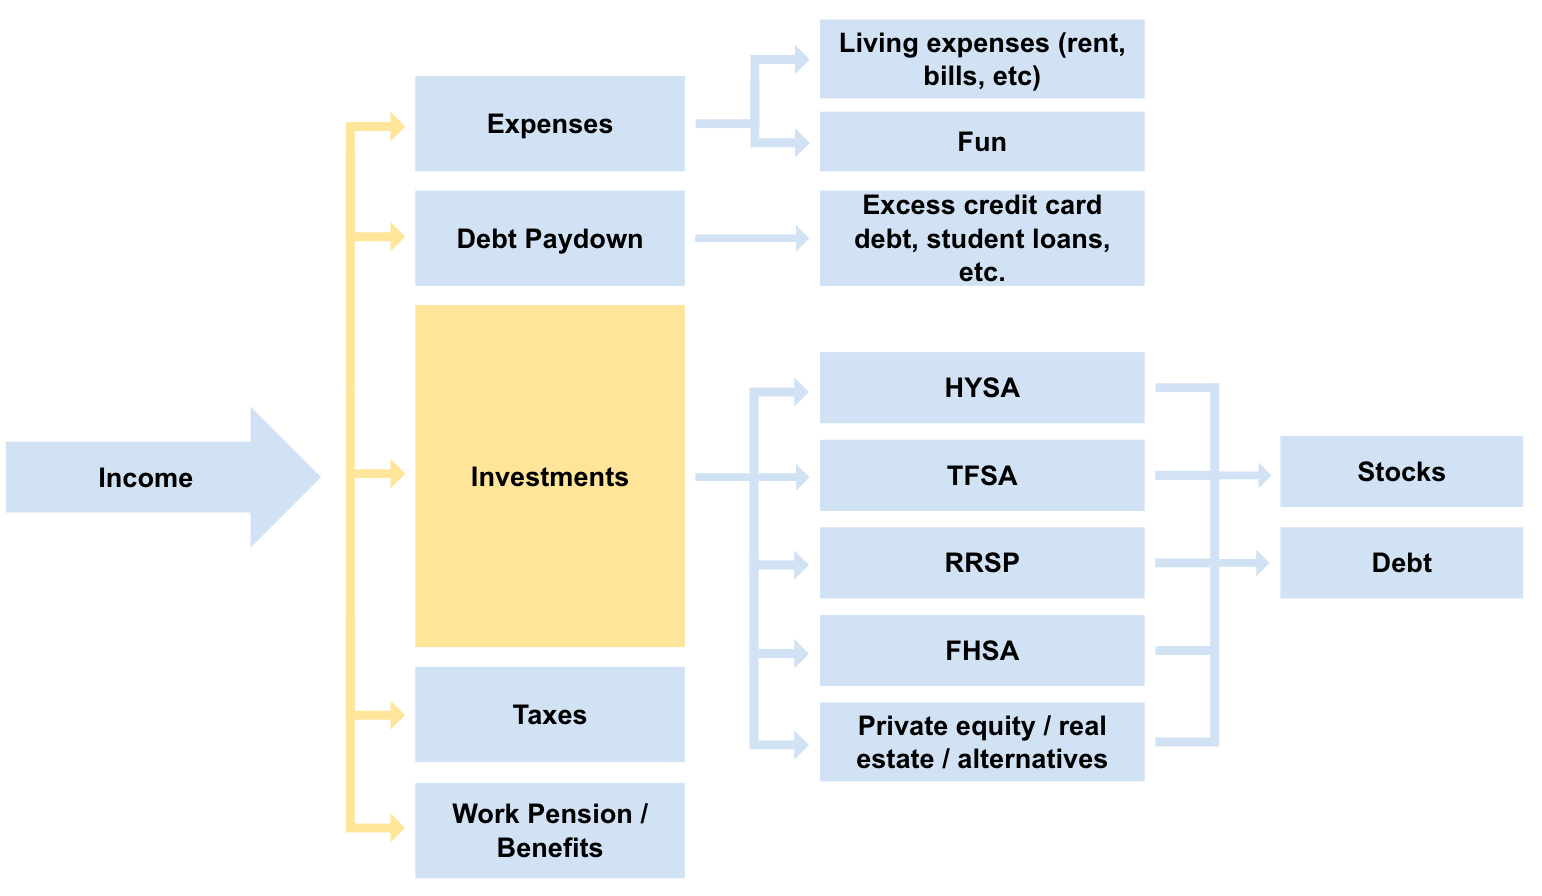
This chapter focuses on how to understand how much you can actually save from your take-home pay after taxes (yellow part highlighted above). We will use the term “savings” in this chapter, as first you have to move that saved money, then you can invest it. Investing your savings comes in the next chapters.
Understand Your Spendings
To drive forward, you need to check the rear-view mirror occasionally. Chances are, you “feel fine” about your cash flows, but you couldn’t tell us how what % you save or where your money actually goes.
The first thing we recommend doing is to detail out the last 3-5 months of your debit and credit card accounts to see what your money actually does on a page in front of you. The numbers don’t lie. This will likely be painful and sobering, but very worth it.
Download your debit/credit card statements into Excel: Go online to your bank/Amex, hit download in csv (open in Excel) for your last month’s statement.
See how much take-home pay (after taxes) appears along with any other money in. No, returning clothes does not girl-math to you making money.
Break down your expenses into categories: In a new column, label each expense: rent, phone bills, groceries, fitness/health, personal care, clothing, coffee, loan interest, etc.
Sum up each of those categories: This may become painful (the truth hurts!!!) but great job for taking an honest look at where your money goes.
See how much you can actually save: Average out the amounts that are left over (Savings = revenues - expenses) for those few months.
Repeat for the last 3-6 months. Use our simple template here.
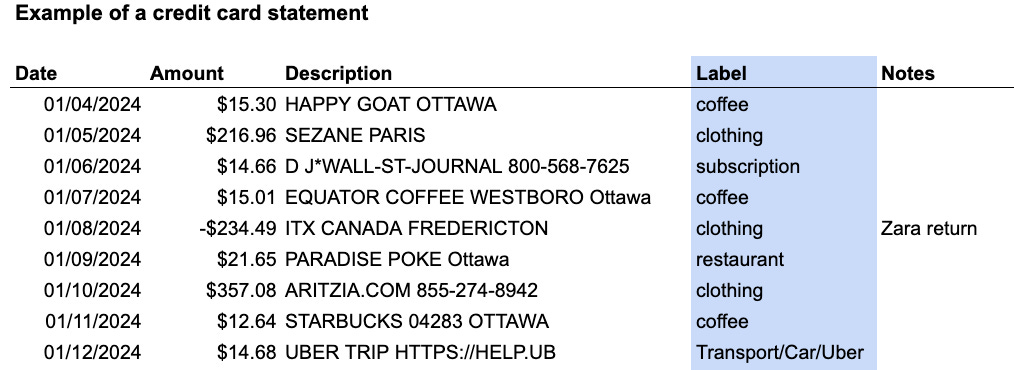
The screenshot above shows part of a January credit card statement of our imaginary example 25-year old consultant Charlotte. In the blue column, she labeled her expenses.
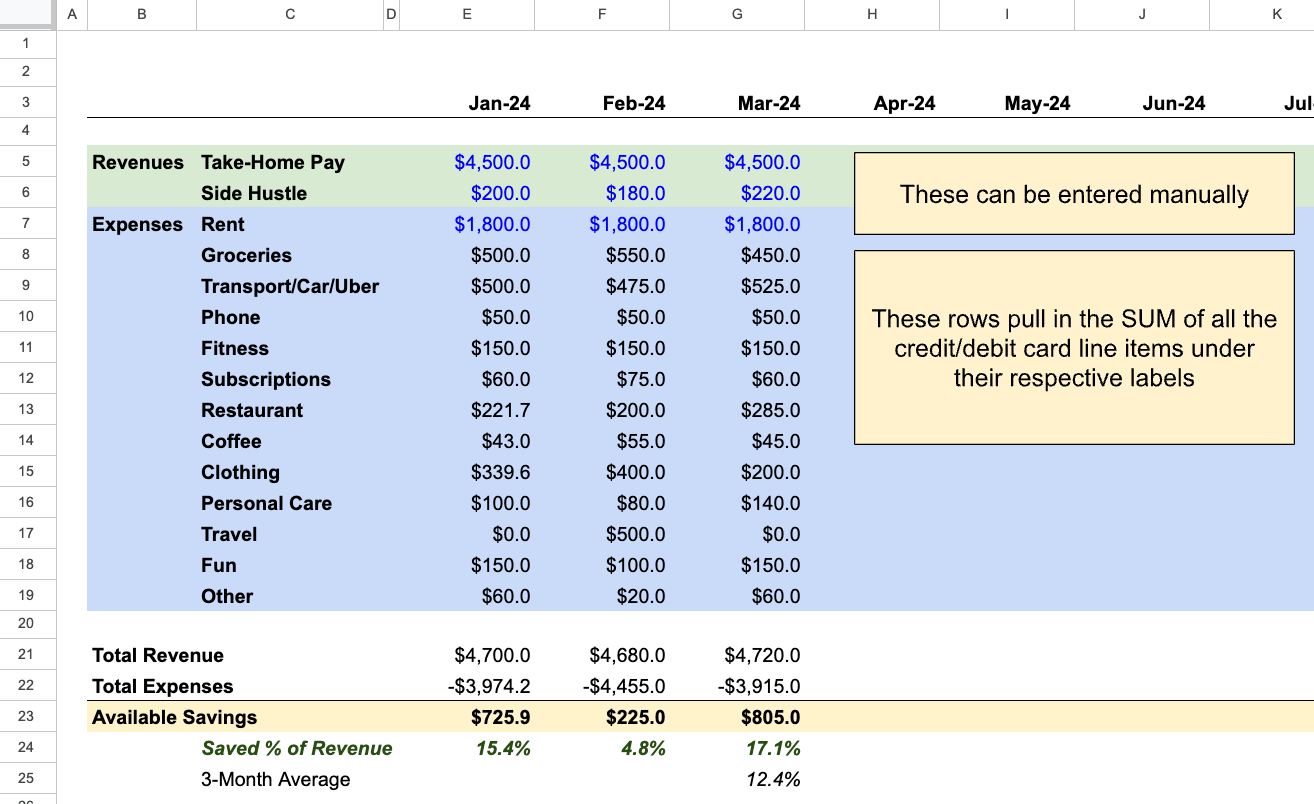
The screenshot above shows the sum total for January (repeated for Feb-Mar) of those categories. For January, Charlotte, was able to save $725 after all her spendings. In February, Charlotte escaped the Canadian winter with higher travel expenses, but returned to a similar baseline in March. She has no student loans. Ouf, maybe she’ll take less Uber rides and walk more (she doesn’t have a car). The average for those three months was a savings rate of about 12.4% or ~$585/month.
Access a version of this very simple budget to your Google Drive here. These revenue/expense buckets are not comprehensive; we encourage you to add your own. You can also upload your Excel credit card statement to ChatGPT and prompt it to categorize those expenses into your categories. Make sure you prompt the exact categories/examples, then double check it.
Usually after this exercise, you will see how much you spend on your “vices” in actual numbers. This can be painful but can help you cut back on certain areas to free up more to move to investments. You do not have to do this forever - only for a few months to give you datapoints on where you spend your money.
If you want to increase the left over amount after revenues less savings, you either need to: ↑ revenues or ↓ expenses. Simple math. Not always simple to do.
Good Guidelines to Consider
So you do the exercise, and you’re like, “OK, well what should my expense ratios look like?”. Back to our diet analogy: we won’t go Yolanda Hadid on you. We want you to have your chocolate cake but look hot too. In our 20s and 30s, life changes faster than in our 50s; your expenses can change significantly year to year, especially if you’re reaching milestones, moving countries, figuring out your career path, making the most of traveling, etc. But don’t let your future self down - make sure your spendings and investments are intentional.
If you need some suggestions of what “right” could look like for you:
50/30/20:
50% Needs: Allocate 50% of your income to needs (housing, utilities, bills, groceries, transportation)
Rent should be less than 30% of your income
30% Wants: Allocate 30% to entertainment, dining out, fitness, hobbies.
20% Savings: Allocate 20% to investing. We will go over what to do with this 20% in the following chapters.
Modern-day financial influencer HerFirst100K Tori Dunlap suggests finding three priority areas that you can spend on without feeling guilty - and nip the rest.
If you don’t know your priorities, check your previous months for any patterns. One of Fred’s priorities appears to be Uber rides. Can she reconsider having this as a large spending category?
Examples include: travel, eating out, clothing, fitness classes, home decor...
Avoid life-style creep. Don’t live above your means to impress “them”. Focus on maintaining or lowering your current expense ratio to increase savings.
Automate, Automate, Automate
Now that you know you can afford a certain phone bill, rent, etc. every month, consider automating this if it’s not already. Set up Bill Payments through online banking or with your service providers. Marie-Kondo all the monthly subscriptions that you don’t need.
🔑 The most important portion that we automate to the savings bucket is called… “PAY YOURSELF FIRST”.
The idea(l) of “PAY YOURSELF FIRST”, is that you pay your future self before you pay anyone else. You come before your landlords, creditors, telecoms, app store subscriptions - everyone.
Think of it as habit-stacking. Every biweekly paycheque that drops into your account has automations set up the same day to transfer to your savings accounts. It automatically leaves you with your spendable amount so you have no choice but to make do with what you have left over.
In our example, Fred knows she has about $580 left over every month. To challenge himself and spend less on things she doesn’t need, we’ll assume she can make room for $500 to go into savings every month. Using the example below, Fred will automate $250 into her savings every two weeks on her payday.
This concept is very simple, but can be surprisingly hard to start. Let’s do it together.
Open your Google Calendars and set a recurring biweekly reminder on the day you get paid. Call it “PAY YOURSELF FIRST”. Add some fun emojis. 🤑💰
If you’re a freelancer with lumpy income, try to set a date that works for you without going into overdraft.
Decide on an Account: Decide which investment account(s) you want to automate contributions for (TFSA, RRSP, non-registered account, savings accounts…). We’ll explore the types of accounts and which to prioritize in the next chapter, so don’t worry if you don’t know now - just put it in a savings account.
Determine the Amount: Decide how often you want to transfer funds and the amount, in alignment with your financial goals.
Set Up Automatic Transfers:
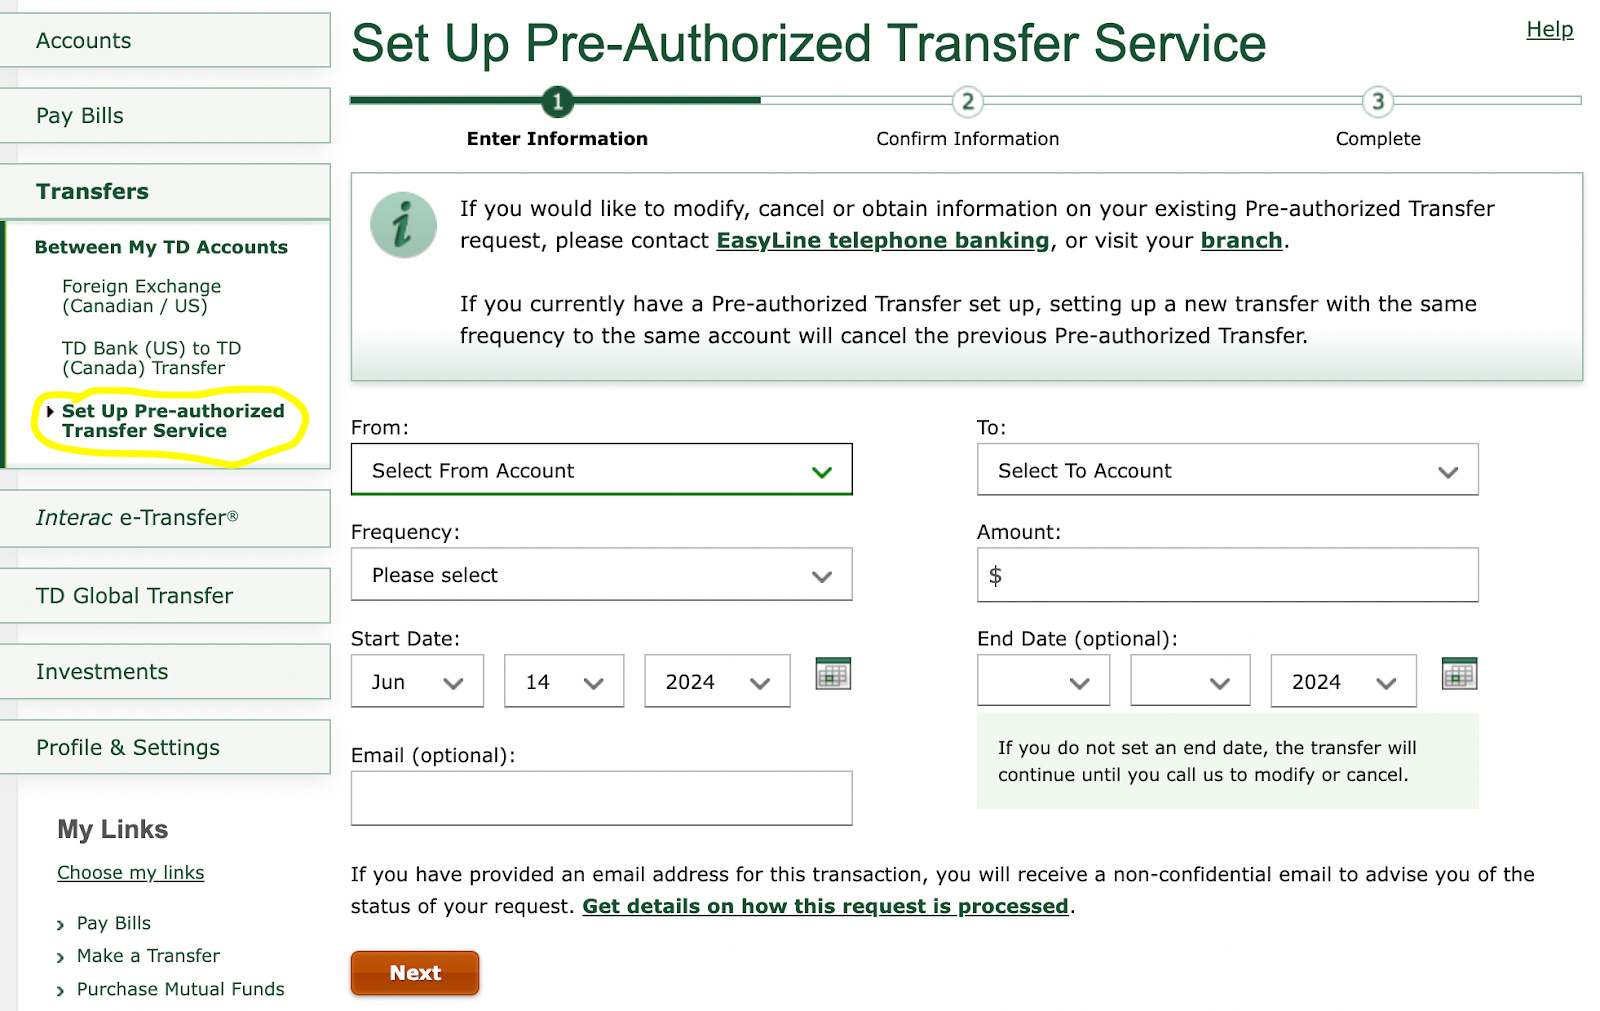
Through Your Bank: Most banks offer the option to set up automatic transfers from your chequing to your savings account(s).
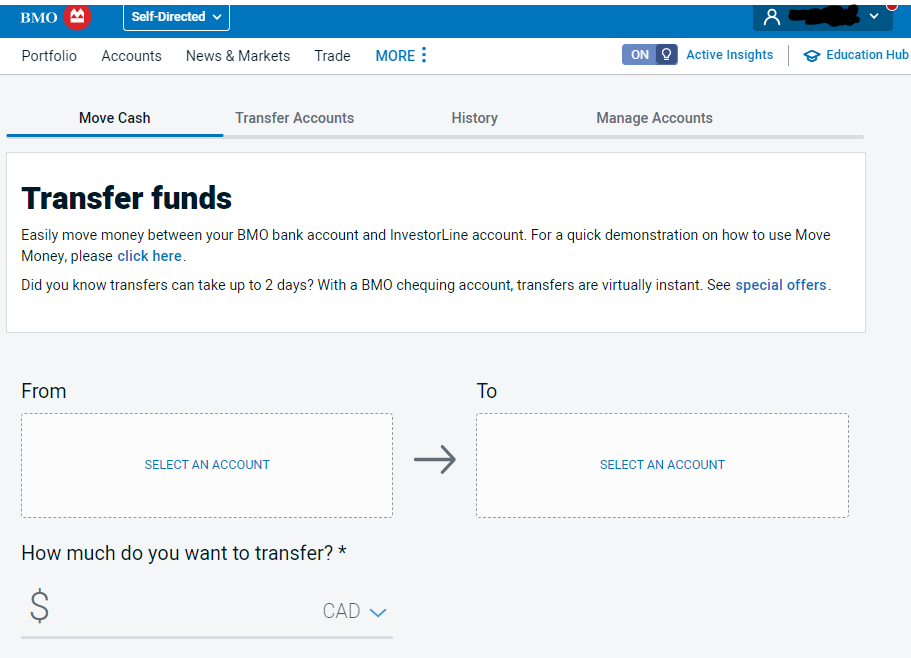
Through Your Brokerage: If you’re using an online brokerage (i.e. TD Direct Investing, BMO Investorline, Wealthsimple Trade) you can set up automatic contributions directly through their platform.
Note that most Canadian banks (classic…) do not allow you to make automatic recurring transfers from your chequeing to TFSA/RRSP. You can either do it through the Brokerage as above, or you can set up automatic transfers to a savings account called "TFSA Contributions", then every few months, transfer from that account to your TFSA, then make one big purchase of ETFs. Cam makes these big ETF purchases twice a year to minimize transaction costs (typically $9.99/trade).
Celebrate! This automation is the hardest part, but best thing you can do for yourself. By creating these “limits” to your paycheque now, you’re giving your future-self freedom.
Benefits of Automating Contributions:
Consistency: Regular contributions help you build wealth steadily over time.
Discipline: Automating removes the temptation to skip contributions or time the market. When you get paid, you pay into your future investments. You can also challenge yourself with a slightly higher amount - we promise you’ll end up finding a way to make it work.
Time Efficiency: Automation saves you time by reducing the need for manual transfers and investments.
Peace of Mind: Knowing your investments are being funded regularly can reduce stress and help you stay on track with your financial goals.
If you have mortgage payments, stay tuned - we are building on our foundation so it will be discussed in future chapters.
TL;DR:
Go through the last few months of your debit/credit card statements. Create a spreadsheet of your revenues - expenses to see how much you usually have left over. Break out your expenses to see which areas you spend the most on.
Rebalance your budget if you need to.
Be more intentional with your purchases. Marie-Kondo all subscriptions and spendings you don’t need.
Automate, automate, automate!
Once you have a good understanding of what your revenues and expenses are, automate as much as you can.
Automate as many expenses as possible through your bank and service providers.
Set a calendar reminder on your paydays call “PAY YOURSELF FIRST”. Automate a $X transfer on this day to a savings account. Do not let yourself cancel the payments - you’ll make it work.
Benefits of automating include consistency, discipline, time efficiency and peace of mind.
We want to hear from you, if you agree with us or not. What are we missing? What can we correct? What can we help you with? DM us, email us or leave a comment.